| Power Supply: 13,8 V | AF SSG | RF VTVM | DC AM-meter |
| AF VTVM | FM Linear Detector | Oscilloscope | RF Power Meter |
| Dummy Load, 50 ohm |
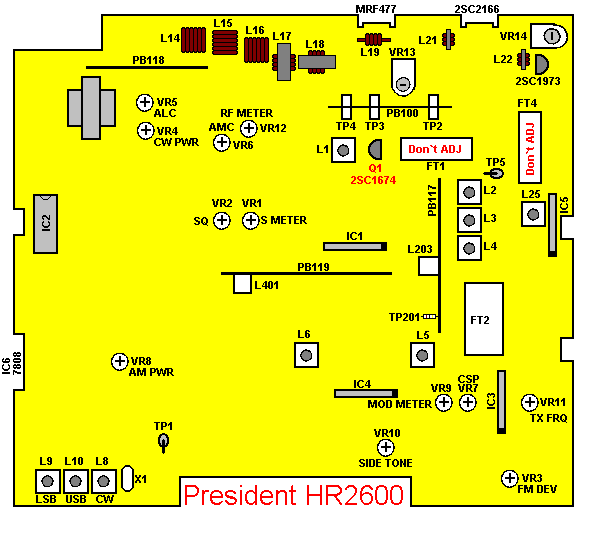
| VR112 | Clockwise | ||
| VR113 | Counter Clockwise | ||
| VR103 | Clockwise | ||
| SWR/CAL | Clockwise | ||
| RF Gain | Middle position | ||
| PA SW | Off | ||
| INDIC SW | RF | ||
| Mic Gain Sw | Off | ||
| RF Power | Max. | ||
| Frequency | 28.000 MHz |
| Step | Condition | Adjustment | Procedure |
|---|---|---|---|
| 1 | USB No Mod. | VR13 | Remove the B002 (PB-100) from Main PCB. Connect a DC AM Meter to TP4 (+) and TP3 (-). Adjust VR13 for 50 mA reading on the DC AM Meter. |
| 2 | USB No Mod. | VR14 | Remove the B002 (PB-100) from Main PCB. Connect the DC AM Meter to TP4 (+) and TP2 (-). Adjust VR14 for 50 mA reading on the DC AM Meter |
| 3 | USB 1 mV Mod. | L25 | Connect a RF Power Meter to Ant.jack. Connect a RF VTVM, an Oscilloscope and an RF Linear Dectector across an Dummy Load to the RF Power meter. Adjust L25 for maximum reading en the RF VTVM. During this step, set the AF Oscillator so that the output is less than 20 V. Repeat this step two times. |
| 4 | USB 30 mV Mod. | VR5 | Adjust VR5 for 32.5 V reading on the RF VTVM. |
| 5 | USB 30 mV Mod. | VR7 | Adjust VR7 so that the carrier leakage at USB and LSB become minimum and almost equal. |
| 6 | CW No Mod. | VR4 | Connect a SW between Pin 8 and 9 of ACC connector. When turn on the SW, adjust VR4 for 21 Watt reading on the RF Power Meter. |
| 7 | AM No Mod. | VR8 | Adjust VR8 for 10 Watt reading on the RF Power Meter |
| 8 | AM No Mod. | VR12 | Adjust VR12 so that "9" LCD just light on. |
| 9 | AM 1 kHz 30 mV Mod. | VR6 | Adjust VR6 to obtain the 85% negative reading on the Oscilloscope. |
| 10 | AM 1 kHz 1 mV Mod. | VR9 | INDIC: MOD. Adjust VR9 so that "9" LCD just light on. |
| 11 | FM 1 kHz 30 mV Mod. | VR3 | Adjust VR3 for +/- 3 kHz deviation on the FM Linear Detector. |
| 12 | CW No Mod. Vol.: Max. | VR10 | Connect an AF VTVM across a Dummy Load (8 ohm) between Pin 1 and Pin 2 of ACC connector. When turn on the SW, adjust VR10 for 0.4 V reading on the AF VTVM. |